Ample research has found that video modeling is an effective way to teach students—especially those with autism—new skills. As noted in the Hussman Institute for Autism’s guide to supporting individuals with autism, “In skills training for children with developmental delays, the passive observation of a model demonstrating the target skill is often more effective than hand‐over‐hand instruction. With low‐skilled students, peer‐modeling – watching a relatively unskilled peer learning a motor skill – can be more effective than modeling by an instructor.” Video modeling involves showing a clip of someone completing a task to a student before asking him to carry out the task himself. Sometimes video models also include explanatory narration or text.
One study found that students learned skills faster from video models than from live models. Others have shown that video models can effectively teach communication, socialization, academic, daily living, and behavior skills. More research indicated that after skill acquisition with video models, generalization and maintenance of the skills learned was high. Videos of adult, peer, cartoon, and self-models have all been shown effective at teaching skills.
So, it’s clear from the research literature that video modeling works. But as a parent or teacher, you may not know where to begin to incorporate it into your curriculum or daily routine. Kaylee Stahr Wynkoop, a graduate student at University of Pittsburgh in the School of Education, comes to the aid of uncertain educators everywhere with a new article in Intervention in School and Clinic describing discrete steps to use video modeling with your students and/or children, which are summarized below.
Step 1: Select students
First, she says, you must select students for whom video modeling will be appropriate. While it has been shown effective for students with a variety of conditions, children with autism may be particularly suited to learn from video modeling due to its visual nature and limited social interaction.
Step 2: Select and define target skills
It’s important to select skills that are appropriate for each student. Just as important is to create a specific rubric that defines the components of each skill. For example, rather than simply saying, “meet someone new,” the rubric might include elements such as reach for a handshake using the right hand, stay at an arm’s length, start with a greeting, and introduce yourself. Carefully defining the components of a task allows the teacher to track a student’s progress and measure whether video modeling is having a positive effect.
Step 3: Inform parents
This step is especially important if the videos will be self-modeled, requiring you to record your students. It also keeps the parents up to date about what their child is learning and encourages skill reinforcement at home.
Step 4: Create a Task Analysis and Data Sheet for each target skill
A task analysis sheet (Figure 1) lists the steps required for a skill. It helps the teacher identify what aspects of a skill are most difficult for a student. The data sheet compiles the data collected on the task analysis sheets for every attempt at the skill and facilitates production of graphs that chart the student’s progress over time.
Step 5: Collect baseline data and set mastery criteria
It’s important to know how well your students can complete the target tasks before you begin using video modeling, so you can measure how video modeling affects their performance. As for mastery criteria, these will depend on the task. They should allow the skill to become functional in the daily life of the student, lead to safe and socially acceptable outcomes, be appropriate for a natural environment (not only a controlled clinic), be realistic, and prepare the student for her next goal.
Step 6: Create and edit videos
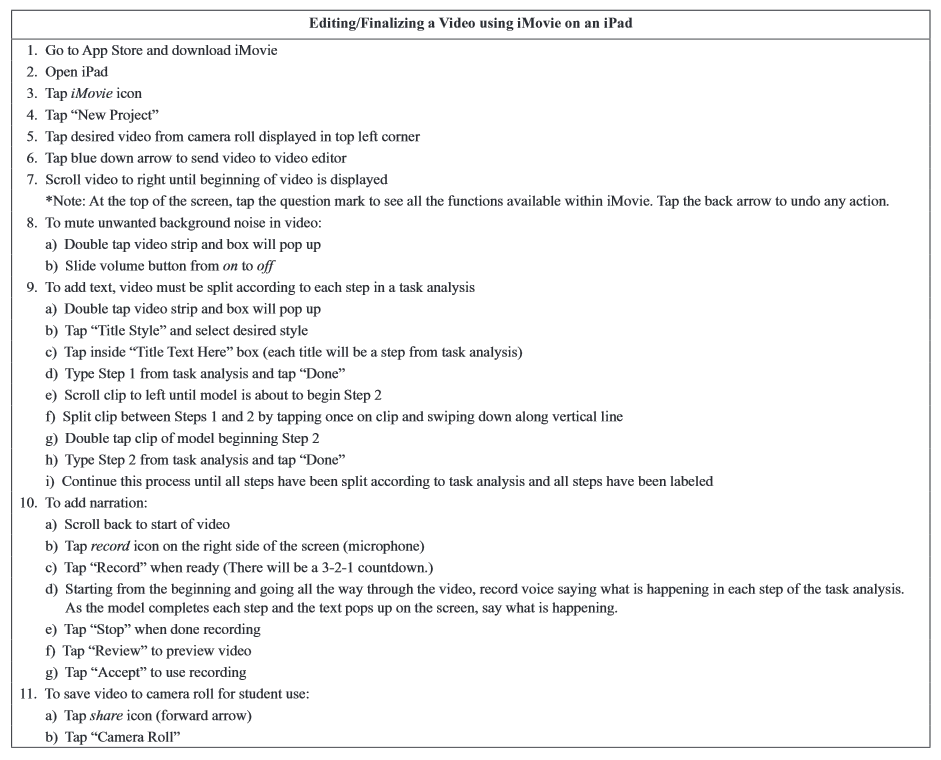
Wynkoop describes using iMovie (free on the iPad) to create videos (Figure 2). This may be especially convenient if your student already uses an iPad as a communication aid. Figure 3 explains how to edit your videos. Before filming, be sure the model is trained in the skill.
Step 7: Schedule video modeling opportunities
It’s important to deliberately schedule time for video modeling to ensure it happens. Wynkoop suggests times such as morning and dismissal routines, transition times, independent work time, or sessions with a paraprofessional—but choose whatever works for your class or family.
Step 8: Carry out video modeling with students
Explain to the student that he will watch a video and then be asked to do the same thing the video model did. Show the video, and then use fading prompts to assist the student in completing the task. Fill out the task analysis sheet as he completes the task, and give praise and reinforcement for any and all sincere attempts to complete the steps of the task.
Step 9: Collect data and monitor student performance
Chart the number of steps of the target skills the student completed independently and frequently review the chart to determine whether the student is improving. If not, it’s time for a change. Different reinforcement or prompting methods may help.
Step 10: Set up opportunities for generalization and maintenance
The ultimate goal is to teach the student to complete the task without watching the video first. Once the student has mastered the target skills with the video model, give the student opportunities to attempt the same skills outside of the normal setting, without the video, and over time. If she is successful, the skills have been generalized and maintained.
With these helpful steps from Wynkoop and a recording device such as an iPad, teachers, parents, and paraprofessionals have the ability to implement video modeling with their students, which has proven effective whether or not the recipients are on the autism spectrum. How will you use video modeling?
Reference:
Wynkoop, KS. (2016). Watch this! A guide to implementing video modeling in the classroom. Intervention in School and Clinic, 51(3):178-183.


